|
Stop Axle Wrap With The Decker Traction Bar
|
 |
|
|
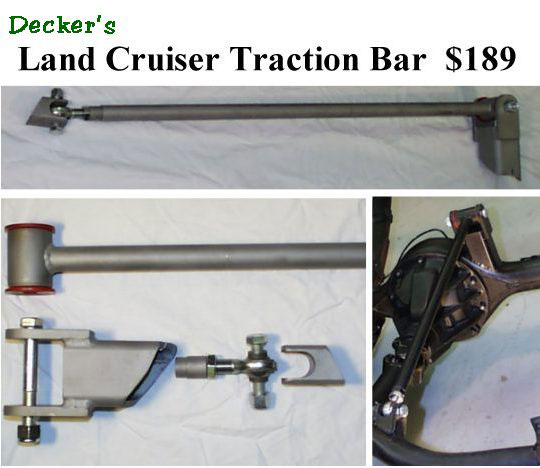
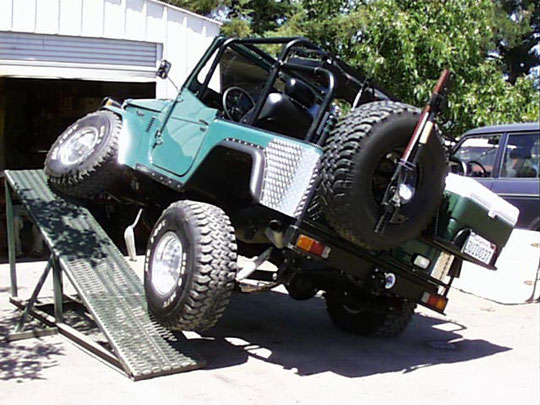
We make a traction bar for the rear of the FJ40 Land Cruiser. It works great and doesn't limit articulation. It requires some welding but the installation is straight forward and fairly easy. A bracket is welded to the top center of the axle that comes up a few inches. A tube runs forward from the axle bracket to a bracket in the center of the cross member just behind the transfer case. The front is mounted with a rod end and the rear is poly bushings. It allows the axle to travel up and down in its natural arc as determined by the spring assembly geometry by keeping the top of the pumpkin from moving fore and aft when power is applied and trys to torque the axle.
Available for Spring Under or Spring Over configuration.
The above pictures are of a spring under kit. The only difference is that on a spring over the rear upright bracket is made longer to compensate for the pivot point of the axle and spring being moved up. A bar made for a spring under will not work on a spring over.
|
The following diagrams show the geometry of various rear spring and traction bar set ups.
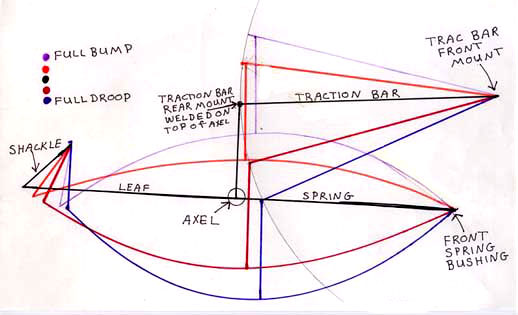
FJ40 REAR (assuming axle is centered on spring)
|
This drawing shows the Land Cruiser rear suspension as it goes through full suspension travel. The front traction bar mount is located above and forward of the front spring bushing. This location allows the rear of the traction bar to swing in an arc that is very similar to the arc of the traction bar bkt that is welded to the top of the axle. This means that the traction bar is not applying undue force to the top of the pumpkin/axle as it travels in it's arc but is preventing it from wrapping when torque is applied. In other words as the spring is compressed and the axle moves up and back the traction bar follows it because it is swinging in the same arc.
* Note that this drawing is hypothetical as the axle is shown mounted in the center of the spring.
|
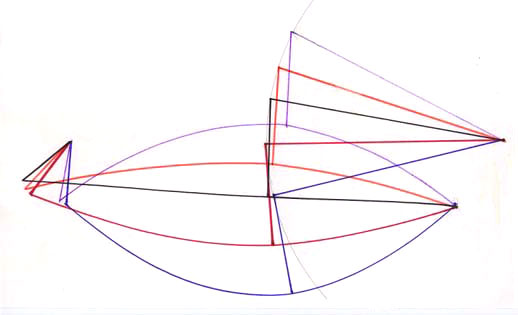
FJ40 REAR (axle is mounted forward of center on spring)
|
|
This drawing shows the axle mounted forward of center on the spring as it is from the factory. In order to get the traction bar to swing in the correct arc the front Traction bar mount is still mounted above and forward of the front spring bushing but somewhat lower (just about where the cross member is behind the FJ40 transfer case). Notice that the line that is drawn through the axle and the rear traction bar mount no longer remains absolutely vertical as the spring travels from droop to bump. This is why Toyota mounted the axle forward of the spring centerline. In full droop the pinion is pointing up and in full bump it is pointing down. This would allow for better U-joint angles.
|
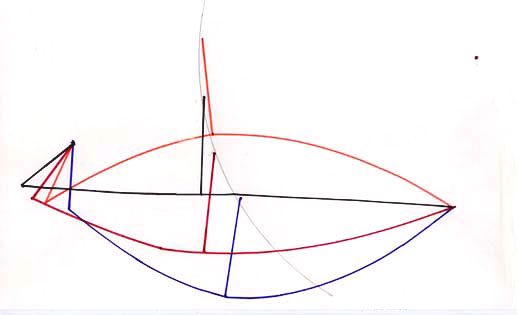
FJ40 REAR (axle is mounted rearward of center on spring)
|
This drawing shows the axle mounted rearward of center on the spring. This would be the case if the rear springs have been flopped front to rear to get a longer wheelbase hence a better departure angle and longer driveline. Notice that as the suspension moves into droop the pinion is pointing down and as it moves into bump the pinion is pointing up, which will not make for good u-joint angles and will increase the chances of breaking a pinion.
*We don't recommend using our Traction Bar if the rear springs have been flipped or the axle is mounted behind the centerline of the springs.
|
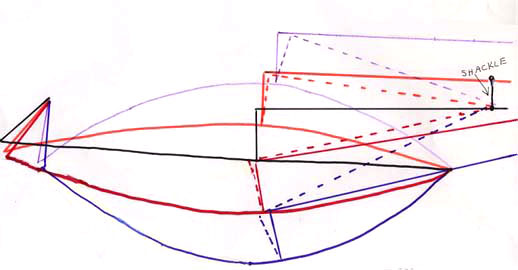
FJ40 REAR WITH LADDER BAR (axle is mounted forward of centerline)
|
|
This drawing shows the axle mounted forward of center in stock position. What I did here was draw a horizontal line 90 degrees to the vertical line that goes through the axle. The solid horizontal lines represents a Ladder Bar that is mounted to the axle but is disconnected from it's front mount. As the axle travels up and down the front of the bar also travels up and down because the ladder bar doesn't have a rear pivot, but rather is triangulated and is fixed to the axle. When the front mount is connected and the front of the bar is fixed vertically (as shown by the dotted lines) it will force the top of the pinion back in droop and forward in bump. This will force the pinion to point toward the back of the transfer case, which is ideal for better u-joint angles, but with the axle bolted solidly to the spring, it will put a twisting force on the springs and the ladder bar. Mounting the rear of the ladder bar to a shackle in the front allows for fore and aft movement, but doesn't allow for up and down movement.
|
Do I need a Traction Bar or Ladder Bar?
Traction bars and ladder bars are both in use and either will help solve axle wrap problems without obvious consequences. With stock Land Cruiser springs you can probably get away with almost anything because they are so flexy. In short if you're having problems with axle wrap, your pumpkin will be torqueing forward and rearward more without a bar than it would be with one with poor geometry.
During articulation one wheel moves up and one drops down. In this case a ladder bar or a traction bar (even one with poor geometry) will work fine and there will be no spring bind because the axle is pivoting from center, where the bar is mounted. For a dedicated trail rig a ladder bar works great. For a vehicle that is driven on the street or as a daily driver a traction bar may be a better choice. If a ladder bar is fitted to a rig at ride height while unloaded, when it is packed full for a trip, the added weight will change the ride height and cause a forward twist on the springs. If the ladder bar is installed on a loaded rig, the springs will be forced to twist backward when unloaded.
We recommend using our traction bar if you use your rig both on the street and on the trail. You will need to have the stock cross tube behind the transfer case still installed and in good condition, or replace it with a heavier bar. We recommend using a doubler to spread out the load if using the stock cross tube, as we have seen a few failures of the tube where the rear mount for the traction bar is welded. We don't recommend using our bar if the rear springs have been flipped. Our bar will not work on the later model FJ40 with the external gas tank.
|
On an FJ40 with modified 4" lift springs fitted with our traction bar we have disconnected the traction bar under full articulation and also when fully loaded for the trail and in both cases were able to easily remove and install the bolt that goes through the forward rod end. Also there was no change in articulation on the RTI ramp after the bar was installed (1244 on a 23 degree ramp). This is a simple design that gets the job done and installs easily.
|
|